24 April 2011

Catching Up&Weeds

It's been raining cats and dogs here this April.  It has literally put a damper on our outside activity so far this month.  Isaac only has one more week at home and we are scrambling to finish some home projects before he leaves.  We are currently in the middle of a medium sized kitchen remodel which has also kept us from the yard.  Despite all of this, we have had a little garden activity.

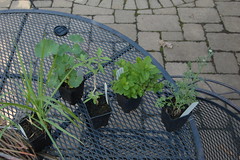
A lot of our two year old parsley did really well over the winter, we were able to dig under the snow and clip off a few sprigs of fresh parsley which was nice during this past bitter winter.  However, this parsley is biennial, which means that it during the second year it will flower, set seed and die. Parsley is a very nutritious herb and easy to grow. It is a great staple if you have limited garden or container space for your herb garden. Here is some nutritional information about parsley.  Although the parsley we have is abundant (5 very large chunks) all of it is going to flower soon, so we are trying to use it up before then.  Isaac removed three large plants and we made pesto with it.  I LOVE pesto!  Fresh basil pesto is my favorite, but I will eat it made with parsley, thyme and arugula to name a few.  We don't really follow a recipe, just eyeball everything (that is how I make salad dressing too).
All you need it a food processor or blender. If you are really hardcore, like some people we know and admire, you can make this with a mortar and pestle.

Take a handful of your herb, in this case parsley.  Place in your mixer of choice.  Add 3-4 smashed cloves of garlic. (This can be more or less to taste, but for me garlic, next to the herb, is the most important flavor in pesto.)  Next add 1/4 c. or so of nuts.  We use walnuts because they are cheaper than pine nuts, but you can really use any kind of nut or seed. Add 1/4 c. of Parmesan cheese, either grated or in small chunks.  Add a small amount of your oil of choice, we use olive, to the rest.  Pulse the processor until the ingredients start to incorporate. Next add more olive oil until the ingredients start to blend finely and becomes a loose paste.  Add salt and pepper to taste.  Add to pasta, sandwiches, veggies, bread etc.


We also had quite a bit of red Russian kale that overwintered nicely.  It was starting to bolt so we pulled it up and made Kale chips!
I learned about this from Isaac's lovely sister.  Preheat your oven to 350 degrees.  Wash, dry and separate your kale. Spread on a baking sheet. Spray or drizzle olive oil onto the kale. Sprinkle with sea salt and any other seasonings that you like. Bake for 10-15 minutes until the kale shrinks and starts to crisp and lightly brown. Let cool and enjoy! These taste like or better than regular chips. They are light crispy and almost melt in your mouth. If you get kale at the farmer's market, your yard or even the store-give it a try! Here is a very nice blog post about kale chips. Here is a photo of some of our kale chips after they came out of the oven. Ignore the messy stove!
 
I suspect many of the plants are enjoying the warmer weather and copious rain. Including the "weeds".  We don't weed in the garden per-se, only when the grass or trees or other somewhat large or invasive plants start growing where we want other stuff to grow.  We treat the plants that volunteer in our garden as allies.  Dandelions aerate the soil and bring up nutrients with their long tap roots and attract pollinators, clover fixes nitrogen and is food for the rabbits (instead of our veggies!), dead nettle is a nice ground cover as their roots grow mainly lightly along the top of the soil, they also attract bees and other beneficial insects.  Here is a photo of all three hanging out in the garden.

So before you start spraying the RoundUp, spend hours on your hands and knees or call your local chemical lawn service.  Remember that lots of these plants are beneficial to your soil, food for animals, attracts beneficial insects and look pretty as well!  Here is another informative blog post on this matter.
I hope to be updating this much more often.  This week will be busy for us, but I should have more time to blog once Isaac is settled and the kitchen is back together.
I'm sure I speak for everyone, I am so happy that it is getting warmer and greener everyday!

17 April 2011

New Plants

*Click on the Links for more information about the plants mentioned!*
Last post I showed you some new plants we bought from Companion Plants.  We are slowly finding homes for them and others that have been waiting for attention for a little while.
One of the homes for several plants is the finished compost pile I shared with you in an earlier post.  Here is the pile now:

It's hard to see, but there is a species (wild) rose: Rosa sancti-andreae (syn. R. villosa?) at the top of the pile.  It will get rather large: 6ft tall and spread; and have small pink flowers.  While this plant will be beautiful in its own right, we are also growing this for its hips that will emerge after the flowers fade. Rose hips are high in vitamin C among other things. Surrounding the rose are small clumps of Roman Chamomile (Chamaemelum nobile) that we are hoping will spread all around this pile. I think most people are familiar with Chamomile tea. Once the plants start blooming, you can collect the flowers and the leaves to make a soothing cup.  Ideally, when the hips on the rose form, we can collect the hips and the chamomile to make an even more nutritional tea. The final plant in this arrangement, to the left and bottom of the pile, is Sweet Woodruff (Galium odoratum) that Iz collected from my most gracious parents who have too much of it. It likes moist and shady places and we hope that the shed next to it and the Paw Paw behind it will give it enough shade in the hot summer months.
Sweet Woodruff is used medicinally for stomach ailments as well as in culinary applications such as to flavor teas and juices.  It is also used to flavor May Wine which is a punch made with Woodruff infused white wine, oranges, pineapple and sugar. This is only one example of May Wine as apparently there are other versions with different flavors. We are really looking forward to making herbal teas from the garden once again. There is nothing like gathering a bunch of fragrant herbs and making a nice iced tea with honey to drink on a hot summer evening. Perhaps that will be a blog topic in the near future!

Since the taking of this photo Iz has added more to this bed: Lemon Verbena (Aloysia citriodora) (another delicious herb in tea or putting under the skin of roast chicken); Codonopsis (Codonopsis pilosula), Meadowsweet (Filipendula ulmaria), and Meadowfoam (Limnanthes Douglasii)

In other plant news Iz planted the Goji Berries (Lycium chinese or barbarum). It is also known as Matrimony Vine.  The folklore attached to this plant states that one must not plant this vine near the home as it may cause "marital discord".


This is Iz planting the Goji in one of the beds at the front of the house, and with my permission, near the house! While the folklore is charming, the best place we have for the Goji is near the house. We promised to move it if we start lashing out at each other for no reason.  This is a vine and Iz added some stakes next to the plants to give them something to climb on.
I better end this now, we have more additions but I will leave that for later! I shall leave you with a little honeybee that was visiting our tulips. Bzzz Bzzz!

10 April 2011

Road Trip: Companion Plants

Iz and I took a trip to Athens, Ohio this week to visit a nursery where Iz has bought a lot of our plants. We drove three hours to visit Companion Plants buy a flat of plants and then drove home! The drive through South East Ohio is beautiful, changing from flat farmland to rolling pastures to dense pine forests. There is really no major interstate that goes from Cincinnati to Athens, so there is plenty of scenery.


We have met the owner of Companion Plants before at and herb festival, but Iz took a moment to reintroduce himself and chat. The owner is so nice and knowledgeable! We took our time to browse, they offer around 600 different plants, and started to accumulate a nice stash of plants.
DSC_0158

Click the images to see what we purchased.

DSC_0154

Here is Isaac browsing in a small section of the greenhouse. Look at the eucalyptus tree!
DSC_0144

There were some really cute terra cotta plant tags for sale but I abstained from buying any.
DSC_0148

 We didn't manage to plant everything when we got home, but we found a home for the Kentucky Colonial Mint. Isaac divided the plant into three to give it more opportunity to spread around the bed.


 I can't wait to use it in tea and other yummy summer drinks!


Even though it was a short road trip, we had a great time!

01 April 2011

Cover Cropping It

Since my last post was about working with your soil to get it healthy and nutritious, I thought I would continue on the theme and talk about growing cover crops.  Generally this is done after your last harvest of whatever you have grown for the season or if you are planning on leaving a plot empty for a season or two. This publication will give you a lot of specific information on choosing which plants to grow and all the benefits or growing cover crops and green manure.

I found a few good passages to put here to give you a better idea of what I am talking about.

"Green manuring" involves the soil incorporation of any field or forage crop while green or soon after flowering, for the purpose of soil improvement. A cover crop is any crop grown to provide soil cover, regardless of whether it is later incorporated. Cover crops are grown primarily to prevent soil erosion by wind and water. Cover crops and green manures can be annual, biennial, or perennial herbaceous plants grown in a pure or mixed stand during all or part of the year. In addition to providing ground cover and, in the case of a legume, fixing nitrogen, they also help suppress weeds and reduce insect pests and diseases. When cover crops are planted to reduce nutrient leaching following a main crop, they are often termed "catch crops."


A major benefit obtained from green manures is the addition of organic matter to the soil.

Cover crops will also aid in fixing nitrogen into the soil. provide a healthy ecosystem for beneficial bacterial and aerate the soil.

Iz and I chose to add some winter cover crops to our large raised bed last fall. We sowed seeds for winter rye, red and white clover, dandelion and alfalfaSince this was the first year for this raised bed, which is sitting on top of plain old Ohio clay soil, we wanted to try and break up the soil beneath the bed and encourage the worms and other nutrients to travel up into it.


It looks a mess but will be incorporated into the soil as it decomposes
A winter cover crop is planted in late summer or fall to provide soil cover during the winter. Often a legume is chosen for the added benefit of nitrogen fixation. In northern states, the plant selected needs to possess enough cold tolerance to survive hard winters. Hairy vetch and rye are among the few selections that meet this need. (From the ATTRA Publication)

We turned over the plants two weekends ago and found that the plants did a good job and rooting deep and providing some organic matter to build the soil as it decomposes.

Look at the tap root and root system of this red clover!


The nice thing about having dandelions in the mix is that you can eat the greens and dry the root for tea instead of turning them into the soil. They just might be the first edible crop you harvest from your spring garden! Enjoy!